Search This Blog

Sunday, March 22, 2015

Stretch Your Dies Day 7: Alphabet and Number Dies

Hello Everyone,
Last day of class :( I have to say that I am so grateful to Jennifer and Kristina for starting these classes because I love them! Today's focus is on alphabet dies. I was really pleased to see Kristina demo how to use freezer paper to create a mask that would work with water colour - I don't have any freezer paper, so I will have to wait to try that technique out. So I decided to make a shaker card. The one that Jennifer showed us, had the die-cut letters from her sentiment as the shaker windows. I decided to go a more traditional route. I did combine this with the sponged background technique that Laura B demo'd yesterday...
My Bestie's daughter turns fourteen this week, so I took this opportunity to make her this card. I die cut all the letters and the circle window and placed them all out until I had the spacing just right. It looks a little off in the pic, but that is just the angle I got with my camera. I love the way this turned out.

Thanks for stopping by and feel free to leave some feedback!

Happy Stamping,
Meg

Saturday, March 21, 2015

More Background Techniques from Stretch Your Dies Day 6

Hello Everyone,
I headed to my craftroom again after lunch with the intention of making a shaped card using the technique that Karolyn Loncon demonstrated; however, my obsession with sponging won out. I decided to experiment with the technique from my previous post a bit and I am thrilled with the results. Here is the first card:
I used the same stencils I made from the post below and sponged over the Hugs sentiment by rotating the position of the stencil. I think the result is really neat. I had also seen on Laura B's blog the use of glossy accents to create dew drops, so I decided to try that too. I inlaid the flower die cut and layered the sentiment die, adhered everything and finally added the dew drops. Here is a close-up of the sentiment and the dew drops.
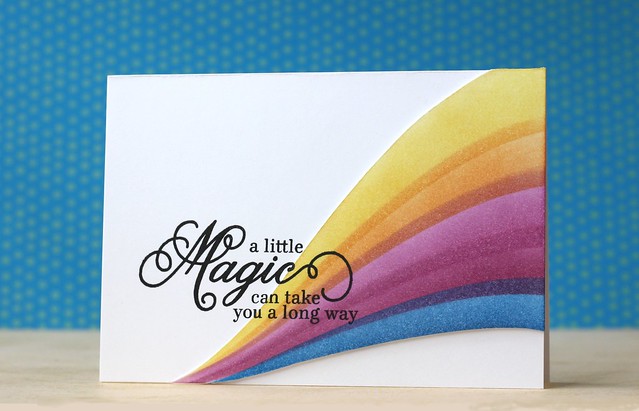
For the second card, I used this card for my inspiration.

Mama Elephant-Magical Moments
I loved the swoop of colour. I started out with the flower from the Penny Black Pinwheel die - thanks to Lisa Adessa who recently celebrated her bogaversary... she had a give-away and I won this die. i die cut it out of white fun foam and coloured it with my copics. Then I used the hill stencil and inked up the sunshiney swoop. The sentiment is from Papertrey Ink (Hello Sunshine). I put it all together and then layered Glossy Accents on the flower and added some dew drops to the sunshiney swoop.
I was too impatient to wait for the glossy accents to dry fully so it is still a little foggy in the photo.
I am so glad that I signed up for this online card class - I almost didn't, since I have done them all, I was thinking there might not be a whole lot more to learn... WRONG! I encourage you if you haven't taken one, to give it a try - they are fun and creatively invigorating.

Thanks for stopping by; I hope you will let me know what you think by leaving some feedback!

Happy Stamping,
Meg


Stretch Your Dies Day Six: Border Dies

Hello Everyone,
Today at Stretch Your Dies the focus is border dies. The techniques demo'd are all great, but the one I love best is by Laura Bassen - she is so talented and I love her videos... she is just so real. She used a curved edge border die to create a stencil or mask. The she did her sponging  magic.

Of course I had to try it out. So, I used my supply of acetate to create a stencil and die cut the edge using a "hill" die from PTI. I masked and sponged with my go-to Distress Inks and here is the result:
I cut the sponged panel I made down and adhered it to the white cardstock. I die cut the "Hugs" from white cardstock and from black fun foam - I offset them slightly when I glued them together in order to create the shadow effect. I also mounted the whole panel on a fun foam mat and adhered it all to the card base. I love the way this card turned out. 

Thanks for stopping by and as always, I love to hear your feedback, so feel free to leave a comment!

Happy Stamping,
Meg

Friday, March 20, 2015

Stretch Your Dies Day Five

Hello Everyone,
With this card I am combing a few things from Stretch Your Dies. One is a "window" card that Jennifer McGuire did on her blog a while ago - they had a link posted in class for more inspiration. The second was a card from day three that showed  how to make window flaps. here is my card:

The first photo gives you an idea of the card overall and the second shows the window with the sentiment peaking through. This was pretty easy to do. I sponged the stripe on the front by masking it off and using my Distress Inks to blend (Peacock Feather, Mustard Seed, Spiced Marmalade, and Picked Raspberry. Then I die cut the window. I held the card closed with masking tape, then stamped the "Happy" through the window. Finally, I opened it up and stamped "birthday" inside. I felt it needed a little something, so I added to silver circle frame to the front. I love the way this simple card turned out.

Thanks for stopping by - feel free to leave a comment!

Happy Stamping,
Meg


Stretch Your Dies Day Five and Time Out Challenges: CAS Black and White with a Splash of Colour

Hello Everyone,
Another fabulous day at Stretch your Dies. Today they were showing us how to use stamp companion dies to create unique backgrounds/images. The technique that really knocked my socks off was demo'd by Dawn Woleslagle of WPlus9. She used the dies to accompany a floral stamp set to create masks. She places the masks randomly on a piece of white cardstock to create a pattern and then sprayed the whole thing with her Copic air brush system. Finally, she peeled off the mask to reveal the white space underneath and stamped in these spaces with the corresponding stamps. You can see the result below.
I loved this idea! The only problem is that I don't have any die/stamps set combos that would work. So... I modified a bit. I cut a circle mask with one of my circle dies and placed them "randomly" on my focal panel. Then I sponged over the whole thing with Picked Raspberry Distress Ink. I peeled a way the masks. I got out my Neat and Tangled "Everyday Circles" set and stamped a few of the sentiments inside the masked area. Here is the result:
I love the retro funky feel of this design. When I finished, I thought it would be perfect for Time Out Challenge this week: black and white with a splash of colour. Now I will admit that this has just a tad more than a splash of colour, but I don't think anyone will mind!

Thanks for stopping by - I love to hear your feedback, so feel free to leave a comment!

Happy Stamping,
Meg

Thursday, March 19, 2015

Muse: You are my Sunshine

Hello Everyone,
Today I am playing along with Muse. I am also using a technique from yesterday's Stretch your dies class where you use your standard shape dies to emboss a frame. Here is our muse card by the uber-talented Marion Vagg:
It is such a bright sunny card I decided to use a long-neglected Lawn Fawn set called "Sunny Skies". I CASEd Marion card pretty directly - I don't think the inspiration will be difficult to figure out! 
I loved the idea of creating a Polaroid. I actually used a 3.25" square die to emboss a frame around my image, then I masked it off and sponged on some Broken China Distress Ink. I stamped the clouds on Vellum and fussy cut them out. I stamped the sunshine on scrap and coloured it with copics, then cut it out. I stamped the two little birds and coloured them with copics too. I am having trouble with my lighting so the colours in the picture look a little dull. In real life they are bright and vibrant.

Thanks for stopping by - I love to hear your feedback.

Happy Stamping,
Meg

Time Out Challenges: Black and White with a Dash of Colour

Grab Our Badge!
Hello Everyone,
Today I am playing along with Time Out Challenges: Black and White with a Splash of Colour. I decided to go on Pinterest for inspiration and was immediately drawn to this card. I cased it almost directly:
My lighting is a little off, but in real life the blue of the butterfly really pops off the black and white background. I love this simple graphic card. Thanks Time Out for this challenge - it really filled my crafting fix for the day!

Thanks for stopping by - I love to hear your feedback.

Happy Stamping,
Meg

Wednesday, March 18, 2015

Stretch Your Dies Day Three and CASology "Blossom"

Hello Everyone,
One more from Stretch your dies Day Three and for CASology "Blossom". I wanted to use the technique of using my dies to create an embossed frame. So, I channeled my inner Maile Belles and made this very CAS card with her "Gracious Vases" Stamp set from Papertrey Ink.
I love this stamp set and haven't used it in awhile. I kept it very simple - just a little copic colouring and the embossed oval frame around the image.
I think it makes for a very elegant combination. I made one with out the frame, but I think the frame just adds a certain "je ne sais quoi".

Thanks for stopping by and I would love to hear your feedback.

Happy stamping,
Meg


Stretch Your Dies Day Three and Paper Smooches Sparks: Anything Goes

Hello Everyone,
Today at Stretch Your Dies online card class the teachers were showing us how to use our basic shapes dies in new ways. Two of the demonstrations were about window cards and while I did try one - it just did not work out. I decided to do a variation of the third demo which was to use your dies to create a masked frame. Since it is "Anything Goes" week over at Paper Smooches Sparks, I decided to use my PS stamps. I used three different PS sets on this card: Bold Buzzwords, Sentiment Sampler and Reflections.
I cut a mask for my main panel using my large oval die (Spellbinders). Once the mask was in place, I stamped the sentiment and then filled in all around with a variety of stamps and leaves. Very simple, but I think altogether effective. I actually used my distress inks to do the stamping: Ripe Persimmon, Peacock Feathers, Picked Raspberry, Mowed Lawn, and Mustard Seed. These inks are not really designed to be used for stamping, so I did have to double stamp. 

Thanks for stopping by and as always, I love to hear your feedback.

Happy Stamping,
Meg

Tuesday, March 17, 2015

Stretch Your Dies Day Two, Part Two

Hello Everyone,
One more card to show from today's class at Stretch Your Dies. Kristina showed us how to die cut a collection of dies into a shape.

I cut a bunch of butterflies from a watercolour background that I created. I laid them out in a circle and placed some masking paper over them to pick them up. The I die cut a heart out of the masking paper - so the butterflies end up in a heart shape. I used the negative space heart mask to sponge a heart onto my card  with Spun Sugar Distress Ink. I put foam squares on the back of all the butterflies (still stuck to heart mask) and adhered them over the sponged heart. I felt there wasn't enough definition, so I added the black dash lines. Finally I popped on the sentiment and put the rest of the card together.

Thanks for stopping by and let me know what you think. I am so looking forward to see what they have in store for us tomorrow.

Happy Stamping,
Meg